
The Ultimate Beginner’s Guide: How to Pick Locks
Picking a lock means manipulating the pins inside the cylinder with two tools: a pick to push the pins up to the shear line, and a tension wrench to hold the light rotational pressure that keeps them set. This guide walks through the technique step by step for pin tumbler locks, the most common type, using a standard beginner's lock pick set.
I learned how to pick a lock at a very young age. Because I desperately needed to unlock my parents’ old number-dial phone to continue prank calling people, I picked my first lock at age seven. I realized the little scraper from a set of nail clippers fitted the lock that prevented the dial from turning, and with a bit of wiggling and jiggling, it opened. I’d picked a lock, and I was hooked.
More than forty years later, I’m still at it: lock picking, not prank calling. It has given me decades of pleasure, knowledge, transferable skills, a job, frustration, friends, and, most importantly, a community in these increasingly atomized times.

So, if you know nothing about lock picking or just about nothing but want to know how to pick a lock, this blog is for you.
This is not a blog dedicated to teaching the specifics of lock picking. That’ll come further down the line for you. This is so you know what you’re doing when looking at pages and pages of basic lock-picking tools in online shops and not knowing what lock-picking set is best for you and what would make the most sense to buy.
Beginners often make the mistake of investing in a lock-picking kit or a lock-picking set that is either overly advanced for their current level or completely unsuitable for the specific locks they aim to pick. Either way, when something is totally useless, it’s totally useless! We don’t want you to waste time and money. We’re lock pickers here, and we’re passionate about it.
And if you need any more advice, just ask us here at Lock Pick World. We’re always happy to help, whatever level you’re at, and whatever your question - please don’t be afraid to ask. We were all beginners once. So, get ready to unlock the secrets and discover the thrill of picking locks for fun, also known as “LockSport.”
RISE OF THE LOCK-SPORTERS
Lock picking has experienced a significant surge as a “sport” in recent years, largely due to the widespread availability of tools and techniques facilitated by the internet. As a teenager, I used to stare at a set of picks through a shop window they wouldn’t let me into because of my age. The thought of those five or six shiny steel items potentially giving me the power to open locks I didn’t have the keys for seemed so exciting. I knew my nail clipper pick wouldn’t open anything else (I tried all the time). But the proper tools, yikes!
When a friend got me online in the late 1990s, and I found a set of picks, I ordered them; a set of jigglers weirdly, a technique I’d “discovered” with the telephone lock. And after some success with those, I got my first proper lock pick set. Three picks, a rake, and one tension tool. And I don’t think a week’s gone by since I haven’t picked a lock.
The internet facilitated the availability of lock-picking tools and advice on how to use them. Specialty stores like ours, which is nearly in its twentieth year, provide easy and friendly access to a wide range of high-quality lock picks, electric pick guns, bump keys, jigglers, tension wrenches, skeleton keys, practice locks, and a host of other training aids and advice on how to make them all work. As a result, the barrier to entry for newcomers was significantly lowered, leading to a surge in interest and participation within the lock-picking community.
And here we are!
Let's start with the basics: Types of Locks.
When we receive inquiries about learning lock picking, we must understand that there are various lock types. These locks may serve the same purpose of securing property, but their mechanisms differ. This distinction influences the lock-picking tools and techniques required to pick them effectively.
Most lock picker hobbyists start with pin cylinders. They’re the most popular locks in the world, and most of the basic principles you’ll adapt to pick other locks are usually learned on pin cylinders.
Let’s have a look at some of the locks that are out there and learn a little bit about them:
- Pin Cylinder Locks: The most common type of lock, featuring a cylinder with double pin stacks of varying lengths. These double-pin stacks prevent the “core” of the cylinder from turning. When the correct key is inserted, it lifts the pins to various heights. This aligns the splits in the pin stacks, allowing the lock’s core to turn and open the lock.
- Disc Detainer Locks: These locks use rotating discs with slots or indentations that must align at specific points to open the lock.
- Lever Locks: Lever locks use a set of levers that must be lifted to specific heights by the correct key, allowing the bolt to move and the lock to open. Though lever locks fall under advanced lock picking, they range in complexity from simple one-lever locks to more challenging five-lever, curtain-protected ones.
- Warded Locks: Warded locks are relatively simple, consisting of obstructions (wards) that prevent keys without the correct shape from turning, providing a basic level of security. It is often frighteningly simple to bypass and still used everywhere. Warded locks are the oldest type, going back to Egyptian times, possibly further.
- Tubular Locks: Tubular locks feature a cylindrical keyway with pins arranged in a circular pattern, commonly found in vending machines, bicycle locks, and some locks for residential doors. It is a pin cylinder, essentially, but in a circle rather than a straight line.
- Combination Locks: Combination locks require entering a specific sequence of numbers or symbols to align internal mechanisms and open the lock, commonly used on safes, lockers, and padlocks. Digital combination locks use electronic components, which can sometimes be easily bypassed.
- Wafer Locks: Wafer locks use flat wafers instead of pins, which must align at specific heights to open the lock, probably most often found in vehicle locks.
Please note that these descriptions are concise summaries, and each lock type may have additional variations and features. There are also other types of locks and a host of security features to prevent both destructive and non-destructive entry. For instance, security pins such as spool or serrated pins make picking pin cylinders more challenging. False gates hamper lever lock picking. This is a basic list to familiarize you with the more popular types of locks.
You might ask, “Why hasn’t he mentioned padlocks?”. A padlock is not a type of lock, it’s more a type of housing. You can get padlocks that are pin cylinders, wafers, disc detainers, levers, etc. Do not confuse the type of lock with the type of locking mechanism.
So, to begin your journey, start with pin cylinders. Once you know your way around a pin cylinder, you’ll be well prepared to move on from there, should you wish. For pin cylinders, you’ll need some picks.
There are two basic types of pick - a “pick” and a “rake.” Although you can use some picks for raking, let’s keep it simple and stick with picks and rakes.
Raking is a good technique for beginners as it’s relatively easy to learn, and you’ll be opening locks very quickly, which is always good for morale. But to move on and learn “lock picking proper,” you’ll need picks. Lock picking proper is where you pick each pin individually. This is known as single pin picking or “SPP” for short.
Most pick sets will contain a selection of picks and rakes and some tension tools, but we’ll deal with those in a minute. Here are the most popular picks and rakes of the day.
NOTE: A classic mistake is to think each pick is for different locks or has a different function in the lock. They don’t; it doesn’t work like that. You’re picking pins, and you’ll find different shapes and designs of picks that suit you and the lock you’re picking at that time. This is something you will learn with time and practice.
So, don’t be overwhelmed when you open your first pick set and twenty picks, and rakes tumble out; they don’t all serve distinct functions. They’re just picks and rakes; their subtle differences will become clear in time. For instance, I’m often asked, “What is a half-diamond pick for?” or, “What is a hook pick for?” The answer both times is—for picking locks! It depends on what lock you’re working on, what problem needs solving (such as a very deep cut pin next to a shallow pin), and, therefore, what pick is most suited.
All sorts of factors dictate the best pick for the job, but they don’t have specific, different jobs. As I said, personal preference will also dictate your pick to attack a certain lock.
A pick (or rake) comprises three basic parts: the handle, the shaft/stem, and the tip. There are sometimes variations to these words, but it becomes quite clear which part is which very quickly.

Here’s a list of what I’d expect in a basic but decent beginner lock pick set:
- Hooks: A common lock pick with a curved tip. These typically come with different lengths, depths, and thicknesses of the hook at the picking tip
- Half-Diamond Pick: A versatile pick with a half-diamond-shaped tip.
- Deforest Diamond: A half-diamond pick with an angled stem for reaching where a standard half-diamond can’t.
- City Rake: A rake where a fair amount of the stem resembles a city skyline. Used exclusively for raking.
- Bogota/B-Rake/Triple-peak Rake: Named after the mountain ranges in Bogota, Columbia, where Raimundo, who invented this superb rake, is from. Only used for raking.
- Tension Wrench: A tool for applying rotational pressure on the lock’s core. Without this aspect, there would be no lock-picking. Often long, thin “L” shaped pieces of metal, frequently with a twist in the shaft.
Tension Tools
A tension tool is essential in picking locks. It plays a crucial role in creating the necessary tension or rotational force to manipulate the lock’s internal components.
The tension tool is typically a thin, flat piece of metal, often resembling an L-shape or a “Z.” One end of the tool is inserted into the keyway, engaging with the lock’s core, while the other end provides a handle for the lock picker to apply pressure. The tool is carefully positioned to exert slight rotational pressure on the lock’s core (sometimes called the “plug”).
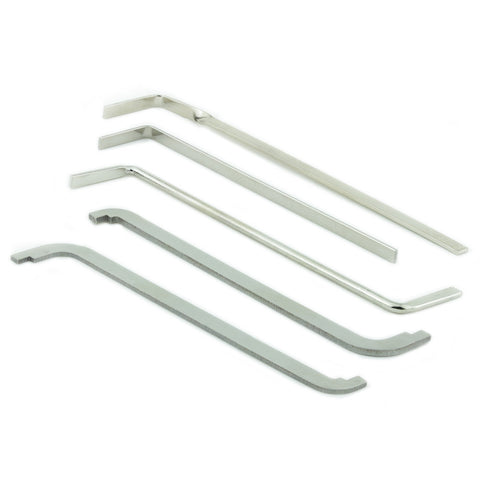
A selection of Bottom of Keyway (BOK) tension tools (that’s the top three) and Top of Keyway tension tools (TOK), which are the two at the bottom.
Tension tools come in many forms, although there are only three basic types:
- Bottom of Keyway (BOK): The tool is inserted into the bottom of the lock’s keyway.
- Top of Keyway (TOK): The tool is inserted into the top of the lock’s keyway.
- Circular Tension Tool. These are less commonly used than BOK and TOK wrenches, although are preferred by a lot of people for using electric pick guns due to the kinetic nature of those tools.
The Basics of Locks
To begin our journey into lock picking, it’s essential to understand the basic components and mechanics of locks. A typical pin cylinder lock includes several crucial elements, including the keyway, pins, springs, and core.
The keyway is the opening where the key is inserted, while the core houses the pins and springs. As the key is inserted, the pins align at the shear line, allowing the core to turn and unlock the lock. Understanding these components will provide a solid foundation for further exploration.
Pin Stacks
Pin cylinders have a row of pins in stacks of two pins. The pins that make contact with the key (and your picks) are called the “key pins.” The other pin in each stack is called the “driver pin,” as the spring “drives” this pin onto the key pin.
The driver pins prevent the lock’s core (sometimes called “plug”) from turning by sitting along the line that divides the core from the housing. The correct key will lift the key and driver pins to the right height. So, the split in the pin stacks between the key and driver pins is now perfectly aligned with the divide between the core and the housing. We call this imaginary line the “shear line.”

To practice lock picking effectively, you’ll need a few essential tools. These tools include lock picks, tension wrenches, and a practice lock. Lock picks come in various shapes and sizes, each designed to manipulate the pins within the lock. Tension wrenches, on the other hand, apply slight rotational force to the core.
Finally, a practice lock allows you to hone your skills without the risk of damaging a working lock. Acquiring the right tools is an important step toward becoming proficient in lock picking.
Some people prefer to avoid practice or “training” locks. However, in my twenty years of teaching lock picking, I’ve yet to find a better way to show how a lock works and how lock picking is possible.

A repinnable and cut-away training lock. This lock can be repinned for different “biting,” meaning the arrangement of different heights of pins to create a different challenge each time. When learning how to pick locks, you can repin this lock and see how the key works and how the pins respond to your pick.
Now that we understand the fundamentals and have the necessary tools, it’s time to dive into the practical aspects of lock picking. The two primary techniques used by lock pickers are single-pin picking and raking. Single-pin picking involves manipulating each pin individually until they align at the shear line, allowing the lock to be turned.
This is where the tension tool comes in. If we’re single-pin picking or raking, why don’t the pins fall back into place when we pick them? Good question! When we insert a tension tool, we put a small amount of turning pressure on the core, which moves the core a fraction of a millimeter, creating a tiny ledge. When single-pin picking, the aim is to get the driver pin to sit on this ledge. The lock will open once all the driver pins are sitting on this ledge—because we’re still applying tension to the tension tool.

Dangerfield Serenity. A perfect beginner’s set comprising a decent selection of state-of-the-art lock picks, rakes, and both top and bottom of the keyway tension tools. Many beginner’s sets try to impress with quantity but usually at the cost of quality. This set will see you on your lock-picking journey for a long while, it has everything you need.
It’s much the same with raking. But instead of picking each pin individually, we rake them all simultaneously. In time, sometimes seconds, sometimes minutes, each driver pin will end up resting on the ledge, and the core will turn due to pressure on the tension tool.
Lock picking is an intriguing and rewarding skill that combines precision, patience, and problem-solving. This beginner’s guide has provided a glimpse into the lock-picking world, offering foundational knowledge of tools and techniques. As with any skill, becoming proficient in lock picking requires practice, dedication, and a genuine interest in the craft.
So, embrace the challenge, sharpen your skills, and unlock the captivating world of lock-picking for fun.
READ NEXT:The perfect next blog for you is THE BINDING PIN PRINCIPLE
Chris Dangerfield
Read even more about Lock Picking!
Get the fully illustrated, expanded physical book. Delivered to you worldwide. It's always better to have it in your hands: Lock Picking How-to Book. Read the expansive, illustrated 60 pages
Where to go next
Once the basics make sense, these guides and collections take you further:
- Types of locks: a complete guide to lock mechanisms. How pin tumbler, wafer, dimple, disc detainer, and other locks differ.
- The best lock pick sets, reviewed. Our hands-on buyer's guide.
- Shop all lock pick sets, from beginner kits to professional sets.
- Practice locks: clear training locks that let you watch the pins set.
- How to open a lock without a key: non-picking methods and when they apply.
Frequently asked questions
Can you really pick a lock with a bobby pin?
Sometimes, on a cheap pin tumbler lock. You bend one bobby pin into a pick and another into a tension wrench. It's slow, unreliable, and tends to damage the pin or the lock. A basic pick set costs little, lasts for years, and teaches proper technique from the start.
What's the easiest lock for a beginner to pick?
A clear acrylic practice lock is the easiest, and the best lock to learn on, because you can watch the pins set at the shear line. After that, a cheap brass padlock with a standard pin tumbler mechanism and no security pins is the usual next step.
How long does it take to learn lock picking?
Most beginners open a clear practice lock within 15 to 30 minutes, and a basic real-world pin tumbler within one to two weeks of regular practice. Security pins, tight keyways, and high-security cylinders take months. Lock picking rewards patient, steady repetition more than raw talent.
Is owning a lock pick set legal?
In most of the United States, owning lock picks for hobby, sport, or trade use is legal. A few states treat possession as evidence of intent, so check your state code before buying. In the UK, owning picks is legal; using them on a lock you have no right to open is not.
What's the difference between picking and bumping a lock?
Picking manipulates each pin to the shear line with a pick and tension wrench, and works on a wide range of locks. Bumping uses a specially cut bump key and a sharp tap to bounce every pin at once. Bumping is faster but louder, cruder, and easier for a quality lock to resist.
Can you pick a lock without leaving evidence?
Clean single pin picking usually leaves no visible trace, which is part of why locksport values the skill. A forensic locksmith can still find fine tool marks under magnification. Raking and pick guns are more likely to leave scratches inside the keyway.
Why won't my lock pick work?
The two most common reasons are tension and pick choice. Too much tension locks the pins solid; too little lets them drop. Work in a light, steady range. The other fault is the wrong pick for the keyway, where a hook that's too tall or too short can't reach the pins cleanly.
Do high-security locks need different techniques?
Yes. Spool, serrated, and mushroom security pins create false sets that fool beginners, and they call for careful tension control and counter-rotation. Dimple, disc detainer, and tubular locks need their own dedicated picks. The core skill of reading feedback carries over, but the patience and tooling requirements rise.
Ready to pick your first lock?
You know the technique. Here is how to get hands-on.


Every LockPickWorld lock pick set ships with a free starter eBook, and US orders over $49 ship free.